Saturday 18 June 2016

Excel Level-Up: Day 10

Chart Template

Are you happy with the new look of your graph from yesterday? It could be troublesome to apply the same steps for each graph…

What if I tell you that you can save the nice chart as a template? And you can apply that template to all your future graphs?

Does that sound like a good idea?

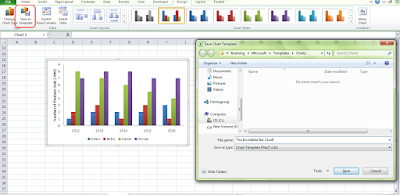
Now, select your nicely formatted graph. Go to “Design” under the “Chart Tools” ribbon.  Click “Save as Template”. Save it as “The Incredible Bar Chart” (just kidding!).


Now you have the nicely formatted template in your pocket. 


Let’s say you have just plotted another bar chart. Select the graph. Click “Change Chart Type” under the same ribbon, click “Template”. Select “The Incredible Bar Chart”. OK.


 You graph has just been leveled-up within 2 seconds.

And with that, thank you for staying with us for these 10 days. We sincerely hope you learnt something useful in Excel. Leave us comment and let us know if you want to learn anything else in details! Share with your friends if you find these useful.

Go back to previous awesome trick: Excel Level-Up: Day 9
Friday 17 June 2016

Excel Level-Up: Day 9

No more default graph

Does your chart always look like this?


While it is quick and easy to produce, it shows you as an Excel amateur too. Worse, this graph tells us that you are too lazy to bother about formatting it into a nicer/tidier chart.

As people judge you from your graphs (we all know they should not, but in reality, they do!), it is worth spending some time upgrading our graphs. 

In the minimum, please,
Step 1: Remove grideline
Step 2: Move your legend to the bottom, to maximize the graph area
Step 3: Label your axis
Step 4: Remove tick marks on the axis
Step 5: Change the texture of your graph and the colour of the fonts.


How do you feel about your graph now?

Go back to previous awesome trick: Excel Level-Up: Day 8
Proceed to next awesome trick: Excel Level-Up: Day 10

Thursday 16 June 2016

Excel Level-Up: Day 8

Plotting Graph

Are you being traumatized from your past graph plotting experience?

Today, we are going to show you an error-proof graph plotting trick. It is a very simple trick that rectifies mistakes that most of us do when plotting graph.

Do you always construct your table in this way when you plot your graph? 
If so, you are most likely to have to adjust for the axis label and will have to remove the “Year” column manually.


Here is our trick, in order for the graph to pop out nicely, REMEMBER, to let the left-upmost cell to be EMPTY. So, if you just clear that cell and re-plot your graph, it will fall out just nicely.


It is as simple as that.


Go back to previous awesome trick: Excel Level-Up: Day 7
Proceed to next awesome trick: Excel Level-Up: Day 9

Wednesday 15 June 2016

Excel Level-Up: Day 7

Conditional Formatting

This is a very useful trick if you have to analyze huge bunch of numbers all the time. Imagine you have a very big table and you are trying to figure out the trend or trying to find the largest number. The quickest and most intuitional way of doing this is by using conditional formatting.
It is an in-built function in Excel that allows you capturing any trend/pattern in the data within seconds. 

Now, go to “Home” ribbon, and click on “Conditional Formatting”. Then, go to “Colour Scales” and choose your favourite colour scales to apply on the data.


As our intention is to introduce you “Conditional Formatting”, we will leave you to explore on other potential usage of this amazing function. As you can see, there are still plenty of options that can be chosen from. 

I assure you that each of them is very helpful and worth your time exploring.

Go back to previous awesome trick: Excel Level-Up: Day 6
Proceed to next awesome trick: Excel Level-Up: Day 8


Tuesday 14 June 2016

Excel Level-Up: Day 6

Evaluating Formula

How do you understand a super long formula like this?

=IF(OR($R150="",W$148=""),"",IF(2016+$P$150-W$148>$P$159,"",MAX(IF(COUNT($S$148:W$148)=COUNT($S$148:$AB$148),OFFSET($X$99:$X$108,($P$159-COUNT($S$148:W$148)),0,1,1),IF((1-OFFSET($AF$149:$AF$158,($P$159-$P$150-COUNT($S$148:W$148)+1),0,1,1))=0,IF((OFFSET($X$99:$X$108,($P$159-$P$150-COUNT($S$148:W$148)+1),0,1,1))=0,0,IF($P$150>1,0,OFFSET($X$99:$X$108,($P$159-$P$150-COUNT($S$148:W$148)+1),0,1,1))),IF($R150-W$148=$P$159,IF(OFFSET($AF$149:$AF$158,($P$159-COUNT($S$148:W$148)),0,1,1)=1,0,(1-OFFSET($AF$149:$AF$158,0,0,1,1))/(1-OFFSET($AF$149:$AF$158,($P$159-COUNT($S$148:W$148)),0,1,1))*OFFSET($X$99:$X$108,($P$159-COUNT($S$148:W$148)),0,1,1)),IF((OFFSET($AF$149:$AF$158,($P$159-COUNT($S$148:W$148)),0,1,1))=1,0,(OFFSET($AF$149:$AF$158,($P$159-$P$150-COUNT($S$148:W$148)),0,1,1)-OFFSET($AF$149:$AF$158,($P$159-$P$150-COUNT($S$148:W$148)+1),0,1,1))/(1-OFFSET($AF$149:$AF$158,($P$159-COUNT($S$148:W$148)),0,1,1))*OFFSET($X$99:$X$108,($P$159-COUNT($S$148:W$148)),0,1,1))))),0)))

Luckily, Excel understands your difficulty and so has built-in an awesome tool called “Evaluate Formula”.

Go to “Formula” tab in the ribbon, “Evaluate Formula” is in the Formula Auditing section.


This function helps you breaking down the long formula into smaller digestible bits. Each time, you click the “Evaluate” button, it will solve the next small part of the formula.


No freak out anymore when you see complicated formula in the future.


Go back to previous awesome trick: Excel Level-Up: Day 5
Proceed to next awesome trick: Excel Level-Up: Day 7

Monday 13 June 2016

Excel Level-Up: Day 5

Number Formats

Today, we are going to share with you some easy to remember but not everyone knows short cut keys. 

The following short cuts are very helpful in formatting your worksheet.

[Control] + [Shift] + [`] to format cell as “General”
[Control] + [Shift] + [1] to format cell as “Number”
[Control] + [Shift] + [2] to format cell as “Time”
[Control] + [Shift] + [3] to format cell as “Date”
[Control] + [Shift] + [4] to format cell as “Currency”
[Control] + [Shift] + [5] to format cell as “Percentage”
[Control] + [Shift] + [6] to format cell as “Scientific”


This should be fairly easy to memorize if you refer to the symbol represented by each number.

Never change the number format of the cells by using the drop down menu again!

Go back to previous awesome trick: Excel Level-Up: Day 4
Proceed to next awesome trick: Excel Level-Up: Day 6

Sunday 12 June 2016

Excel Level-Up: Day 4

Rows and Columns

In a lot of time, we have to play around with rows/columns, for example, insert new columns, hide rows or delete rows.

Today, you will learn how to do all of the above without touching your mouse.

Level 1: Selection
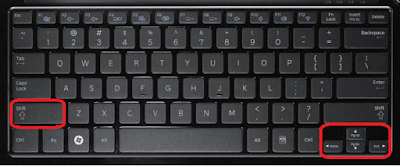
To select a row, press [Shift] + [Spacebar]

To select a column, press [Control] + [Spacebar]


Level 2: Insert
To insert a new row, select a row (refer to Selection), then press [Control] + [Shift] + [+]. It will add a new row above the selected row.
To insert a new column, select a column (refer to Selection), then press [Control] + [Shift] + [+]. It will add a new column to the left of the selected column.


Level 3:
To delete a row or column, select the row/column (refer to Selection), then press [Right Click Button] then [D].


Level 4:
To hide a row or column, select the row/column (refer to Selection), then press [Right Click Button] then [H].


Go back to previous awesome trick: Excel Level-Up: Day 3
Proceed to next awesome trick: Excel Level-Up: Day 5

Saturday 11 June 2016

Excel Level-Up: Day 3

Advance Copy & Paste

I’m sure you are pretty good in copy and paste, i.e. [Control] + [C] and [Control] + [V].

Today, we are going to show you a more sophisticated technique of pasting.

You might have known the “Paste Special” function in the Excel but do you know that it can be done without using mouse?

The trick is very simple, pressing [Alt], then [E], then [S] will prompt the “Paste Special” dialogue out.


From here, you can choose the option that it has by simply press the corresponding letter underlined in each function.

For example, to paste special as value, press [Alt] [E] [S] [V] (one at a time).

To paste special as formatting only, press [Alt] [E] [S] [T]

To paste special as formula only, press [Alt] [E] [S] [F]

Same apply to all functions.


Now, are you excited to use this trick to level up your pasting skills?

Go back to previous awesome trick: Excel Level-Up: Day 2

Proceed to next awesome trick: Excel Level-Up: Day 4

Friday 10 June 2016

Excel Level-Up: Day 2

Dragging Formula

Okay, now you can navigate within a worksheet using just keyboard. So, what’s next?

Do you have the problem of having to drag some cells in order to duplicate formula?

Well, that is too slow and troublesome.

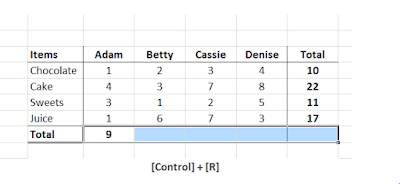
To copy formula downwards: [Control] + [D]


Let’s say you wanted to sum Column A, B,C, D in Column E. Sum the first cell. Select Column E. Press [Control] + [D]


To copy formula to the right: [Control] + [R]


On the other case, let’s say you want to apply the summation to the right. Select the all the relevant cells. Make sure the left-most cell contains the formula that you wanted to duplicate. 
Press [Control] + [R].


 Done.

These two formulas will help you duplicate formula without hassle to the right and down.


Go back to previous awesome trick: Excel Level-Up: Day 1
Proceed to next awesome trick: Excel Level-Up: Day 3

Thursday 9 June 2016

Excel Level-Up: Day 1

Navigation by Keyboard

To work fast in Excel, you must not rely too much on your mouse. Learn to navigate in Excel using keyboard will save your time tremendously. It could be difficult in the beginning, but it will certainly be paid off in long run. The following are some useful shortcuts for navigation.

Level 0: To move to the next cell, I’m sure you know we will be using the [Up], [Down], [Left] and [Right] keys.

Level 1: Slightly harder, use [Control] + [Up] / [Down] / [Left] / [Right] to move to the edge of the data range. This is particularly useful if you are constantly working with big lists or tables.


Imagine you have a table with 25 columns and 10,000 rows.

How do you move from the top of the list to the bottom of the list?

Scroll down?

Nope.

Use [Control] +[Down]

How do you move from the first column to the last column?

Press [Right] continuously.

Nope.

Use [Control] + [Right]


Level 2: If you would like to select cells, use [Shift] + [Up] / [Down] / [Left] / [Right]. No more dragging hassle in the future!


Level 3: Even slightly harder, now if you combine [Control] and [Shift], you can select cells faster. For example,

If you want to select the whole row of a table: [Control] + [Shift] + [Right]

If you want to select a column of a table: [Control] + [Shift] + [Down]


Try applying these tricks in your work today! You might not see the results immediately as it require some practice, but I assure you that your colleague will be impressed. 

Go back to the intro Excel Level-Up: Introduction !
Proceed to the next awesome trick: Excel Level-Up: Day 2

Wednesday 8 June 2016

Excel Level-Up: Introduction

On your first day working, you are assigned to summarize data or generate some graphs using Excel. You look around and realize how other colleagues work in lightning speed but you are struggling to set the axis of your graph to the right unit. You are so impressed how your seniors can draw a table in Excel within 3 seconds. You start grumbling on how ineffective the education system is. How could Excel not be a compulsory subject in school? How do your super colleagues do it?

Of course, experience plays a vital role in sharpening one skill. But surely there are some tricks that can be learnt in short time that will save you from looking dumb.


In the following 10 days, we will show you some Excel tricks that will definitely make you looked pro in Excel.

Stay tuned for  Excel Level-Up: Day 1 tomorrow to start impressing!